I’ve created this DIY to provide instructions only for door panel removal & installation for the following reason:
The DIYs for interior door panel removal seem to be embedded in other harder-to-find, non-door-panel specific threads. (For example, there’s a pretty good one in a thread about Window Motor Replacement.) Not everyone is trying to replace a motor or a specific piece – sometimes people just want to know how to take the panel off for their own specific purpose.
(Note: Depending on your project’s subsequent goals, you might wish to reference my DIY: Interior Door Handle (Latch/Lock Assembly) Replacement or Shift21’s DIY Window Motor Replacement. )
Terminology used in this DIY:
“Grip handle” or “Grip” – The long handle which you grab to pull the door closed.
“Latch handle” – The movable handle which you pull to unlatch & open the door.
“Latch handle backing” or “Catch” – The cup behind the latch handle, in which you insert your fingers to pull it open.
“Bushings” – the plastic hat-shaped pieces through which (5) of the door screws are installed.
“Caps” – the screw head covers for the (3) screws along back edge of door.
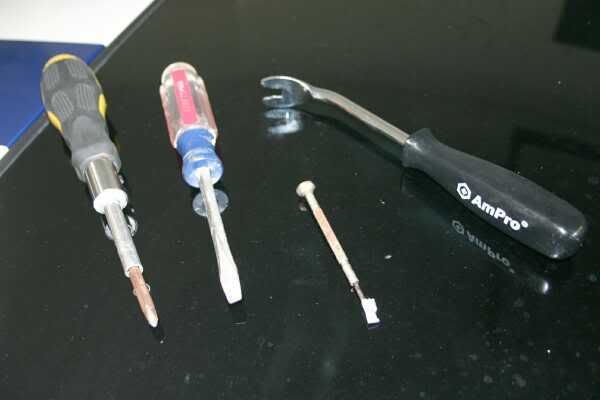
Tools you will need:
-- Flathead screwdriver
-- Tiny flathead screwdriver
-- Philips head screwdriver (magnetic optional, but will help)
-- Door upholstery removal tool (optional but worth it. ~$6 at auto parts store.)
-- Paper & pen for screw retention sketch
![Image]()
(Note, my tiny screwdriver has duct tape on the tip to protect the car's hardware)
Special Note for screw removals:
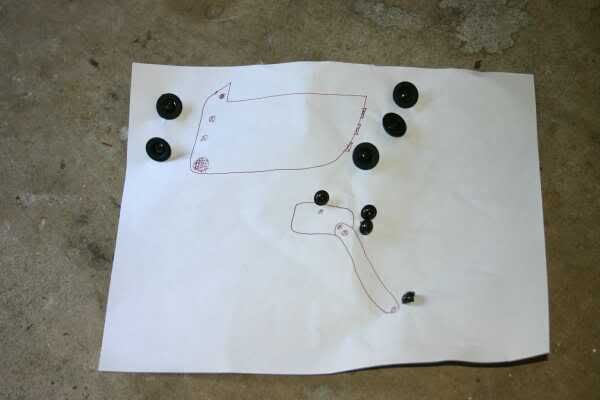
I find it’s often easy to lose track of screws, or remember which screw goes where. I recommend using your pen & paper to draw a sketch of the door and handle area, showing the screw locations. Then, when you remove each screw, pierce the paper with the screw near the sketched location. Here is mine, to show you what I mean:
![Image]()
Panel Removal Procedure:
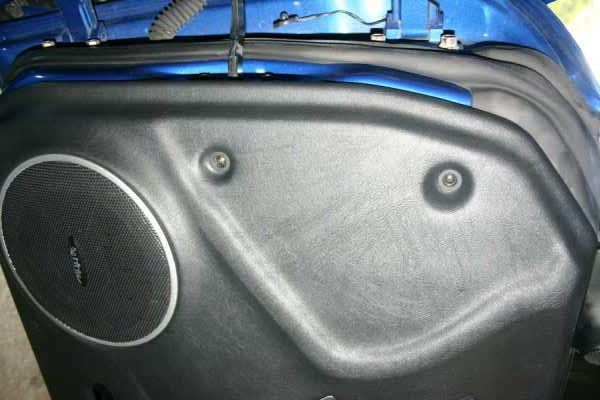
1) Remove (2) screws & plastic bushings near front of door, above speaker.
![Image]()
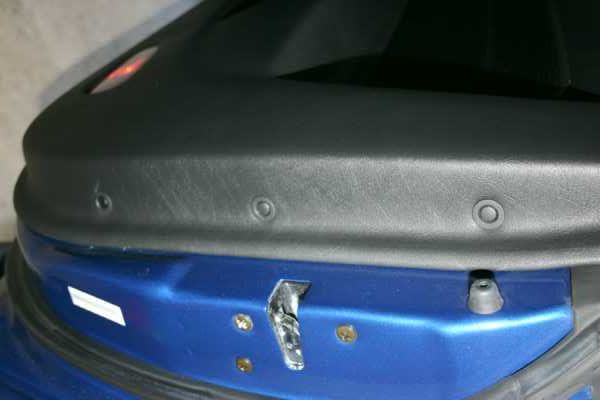
2) Remove (3) caps covering screws along back edge of door, by prying them out with the tiny flathead screwdriver. Remove (3) screws & plastic bushings.
![Image]()
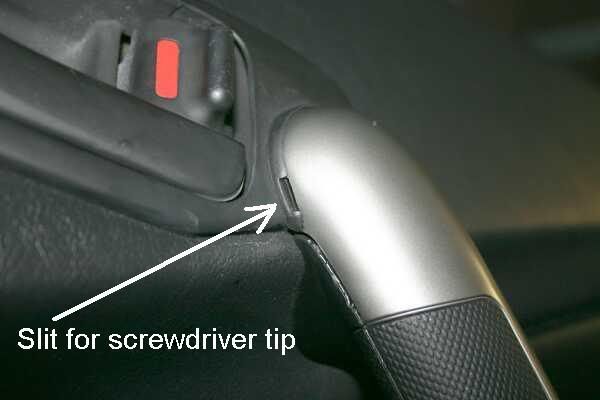
3) Remove grip handle using flathead screwdriver. Pry the grip near the small cutouts; prying near the bottom with another screwdriver will help. Grip handle will pop off.
![Image]()
4) Remove (2) screws holding latch handle backing.
![Image]()
5) Remove latch handle backing -- pull latch handle open and slide backing off
![Image]()
6) Remove (2) screws under grip handle (magnetic tip will help pull these out once loose)
![Image]()
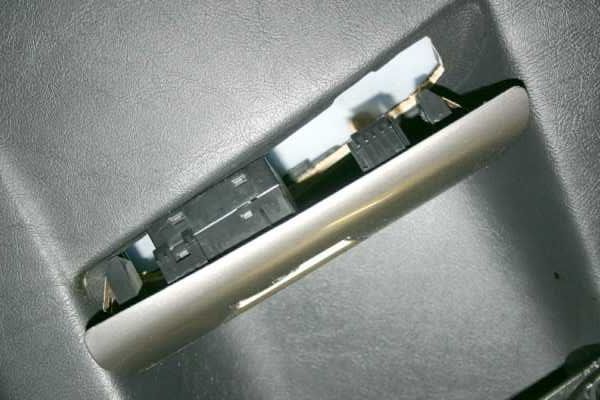
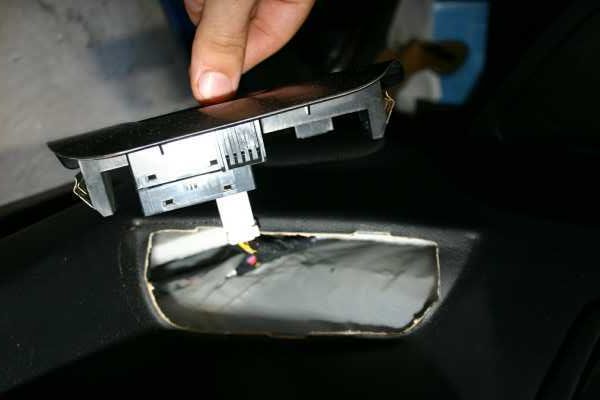
7) Remove window switch plate by prying up around the edges with flathead screwdriver. (Held in with plastic and metal tabs, and will pop out once loose.) Disconnect window switch wire plug (and mirror wire plug, if driver’s side).
![Image]()
![Image]()
8 ) Remove tweeter triangle by simply pulling it off. (Held on by two fixed plastic pegs at the top and forward corners.) Disconnect tweeter wire plug.
![Image]()
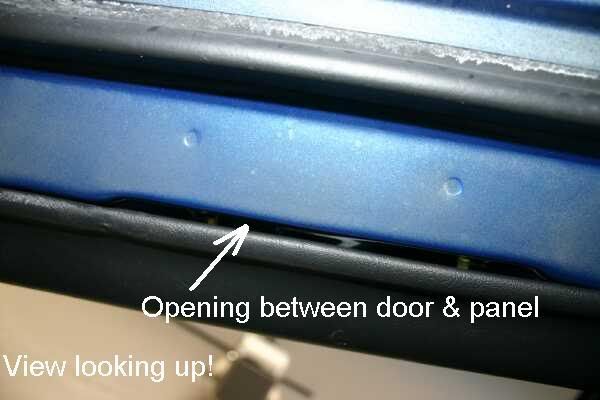
9) Once all the screws have been removed, the door panel is now held on by only five plastic pegs along the bottom edge. Looking along the bottom edge, you will see a slight opening between the panel and the door:
![Image]()
Inside this opening, you’ll see two bolt heads, and somewhere in between a light colored sliver – this is the edge of a plastic peg.
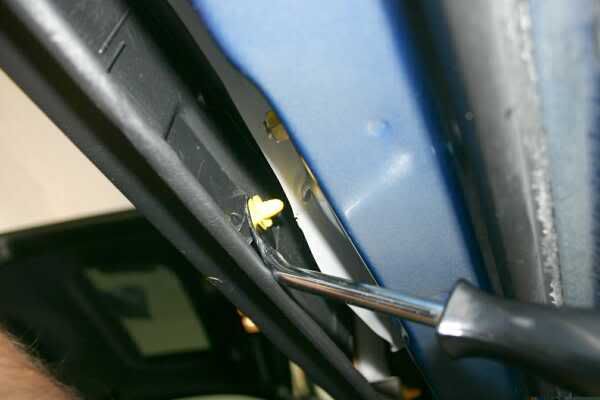
Using the upholstery removal tool, center the teeth around this peg and pry towards the panel. This will properly pop out the peg without breaking it. (If you don't have the upholstery tool, you can probably use the flathead screwdriver or pulling with your fingers -- all at your own risk! I recommend the proper tool.)
![Image]()
If you’re lucky, the adjacent pegs will pop out too … if not, now you’ve got enough opening to use the upholstery removal too to pry them too. The pegs will stay attached to the panel side.
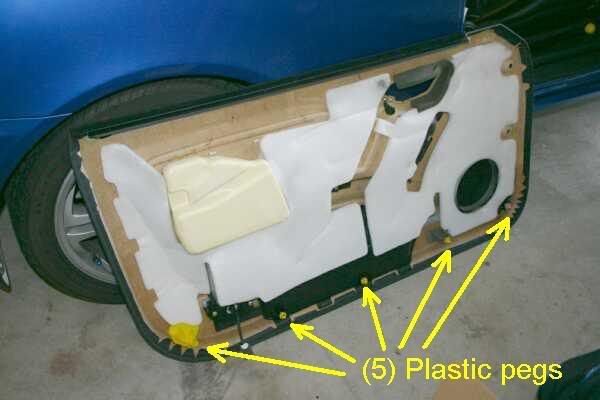
10) Remove the panel by pulling the bottom edge away from the door and lifting the whole panel up. Disconnect wire plug for light (and for trunk release if drivers side).
![Image]()
![Image]()
Note the locations of the (5) plastic pegs.
11) You may have plastic sheeting stuck to the door with some black adhesive. If you need to access the area under the plastic, pull back the plastic with quick hard yanks. Do not pull it slowly or try to peel it, this will only tear the adhesive or the plastic and make it messy. Quick yanks will pull the whole adhesive strip up. It will remain tacky enough to re-seat later.
![Image]()
Panel Reinstallation Procedure:
12) Re-seat any plastic sheeting you’ve pulled up, by simply pushing the adhesive strip back into place.
13) Connect wire plug for light (and for trunk release if drivers side).
14) Re-seat door panel along top edge first, then gently push bottom edge to engage the plastic pegs. You should hear them snap in.
15) Connect tweeter wire plug; install tweeter triangle by engaging its two fixed plastic pegs and pushing it on.
16) Connect window switch wire plug (and mirror wire plug if driver’s side), and install switch plate by simply pushing it in, snapping it into place.
17) Install (2) screws under grip handle.
18 ) Install latch handle backing and its (2) screws.
19) Install grip by snapping it into place.
20) Install (3) screws, bushings, & caps along back edge of door.
21) Install (2) screws & bushings near front of door, above speaker.
--- End of DIY: Interior Door Panel Removal & Installation ---
The DIYs for interior door panel removal seem to be embedded in other harder-to-find, non-door-panel specific threads. (For example, there’s a pretty good one in a thread about Window Motor Replacement.) Not everyone is trying to replace a motor or a specific piece – sometimes people just want to know how to take the panel off for their own specific purpose.
(Note: Depending on your project’s subsequent goals, you might wish to reference my DIY: Interior Door Handle (Latch/Lock Assembly) Replacement or Shift21’s DIY Window Motor Replacement. )
Terminology used in this DIY:
“Grip handle” or “Grip” – The long handle which you grab to pull the door closed.
“Latch handle” – The movable handle which you pull to unlatch & open the door.
“Latch handle backing” or “Catch” – The cup behind the latch handle, in which you insert your fingers to pull it open.
“Bushings” – the plastic hat-shaped pieces through which (5) of the door screws are installed.
“Caps” – the screw head covers for the (3) screws along back edge of door.
Tools you will need:
-- Flathead screwdriver
-- Tiny flathead screwdriver
-- Philips head screwdriver (magnetic optional, but will help)
-- Door upholstery removal tool (optional but worth it. ~$6 at auto parts store.)
-- Paper & pen for screw retention sketch
(Note, my tiny screwdriver has duct tape on the tip to protect the car's hardware)
Special Note for screw removals:
I find it’s often easy to lose track of screws, or remember which screw goes where. I recommend using your pen & paper to draw a sketch of the door and handle area, showing the screw locations. Then, when you remove each screw, pierce the paper with the screw near the sketched location. Here is mine, to show you what I mean:
Panel Removal Procedure:
1) Remove (2) screws & plastic bushings near front of door, above speaker.
2) Remove (3) caps covering screws along back edge of door, by prying them out with the tiny flathead screwdriver. Remove (3) screws & plastic bushings.
3) Remove grip handle using flathead screwdriver. Pry the grip near the small cutouts; prying near the bottom with another screwdriver will help. Grip handle will pop off.
4) Remove (2) screws holding latch handle backing.

5) Remove latch handle backing -- pull latch handle open and slide backing off

6) Remove (2) screws under grip handle (magnetic tip will help pull these out once loose)

7) Remove window switch plate by prying up around the edges with flathead screwdriver. (Held in with plastic and metal tabs, and will pop out once loose.) Disconnect window switch wire plug (and mirror wire plug, if driver’s side).
8 ) Remove tweeter triangle by simply pulling it off. (Held on by two fixed plastic pegs at the top and forward corners.) Disconnect tweeter wire plug.

9) Once all the screws have been removed, the door panel is now held on by only five plastic pegs along the bottom edge. Looking along the bottom edge, you will see a slight opening between the panel and the door:
Inside this opening, you’ll see two bolt heads, and somewhere in between a light colored sliver – this is the edge of a plastic peg.
Using the upholstery removal tool, center the teeth around this peg and pry towards the panel. This will properly pop out the peg without breaking it. (If you don't have the upholstery tool, you can probably use the flathead screwdriver or pulling with your fingers -- all at your own risk! I recommend the proper tool.)
If you’re lucky, the adjacent pegs will pop out too … if not, now you’ve got enough opening to use the upholstery removal too to pry them too. The pegs will stay attached to the panel side.
10) Remove the panel by pulling the bottom edge away from the door and lifting the whole panel up. Disconnect wire plug for light (and for trunk release if drivers side).

Note the locations of the (5) plastic pegs.
11) You may have plastic sheeting stuck to the door with some black adhesive. If you need to access the area under the plastic, pull back the plastic with quick hard yanks. Do not pull it slowly or try to peel it, this will only tear the adhesive or the plastic and make it messy. Quick yanks will pull the whole adhesive strip up. It will remain tacky enough to re-seat later.

Panel Reinstallation Procedure:
12) Re-seat any plastic sheeting you’ve pulled up, by simply pushing the adhesive strip back into place.
13) Connect wire plug for light (and for trunk release if drivers side).
14) Re-seat door panel along top edge first, then gently push bottom edge to engage the plastic pegs. You should hear them snap in.
15) Connect tweeter wire plug; install tweeter triangle by engaging its two fixed plastic pegs and pushing it on.
16) Connect window switch wire plug (and mirror wire plug if driver’s side), and install switch plate by simply pushing it in, snapping it into place.
17) Install (2) screws under grip handle.
18 ) Install latch handle backing and its (2) screws.
19) Install grip by snapping it into place.
20) Install (3) screws, bushings, & caps along back edge of door.
21) Install (2) screws & bushings near front of door, above speaker.
--- End of DIY: Interior Door Panel Removal & Installation ---
")