

So to start off I would like to say that this is another way to remove the steering wheel emblem. Another way is to take the steering wheel apart to remove it giving a clean look as seen in this DIY
http://www.newtiburon.com/forums/showthread.php?t=19273
or by doing it this way. This way takes little mechanical know how and is for those people like me who have nightmares about taking stuff apart and attempting to put it back together again.
After doing this DIY you will NOT have the emblem anymore because it will be in pieces so if you want to keep the emblem so you can put it back on please use the other DIY.
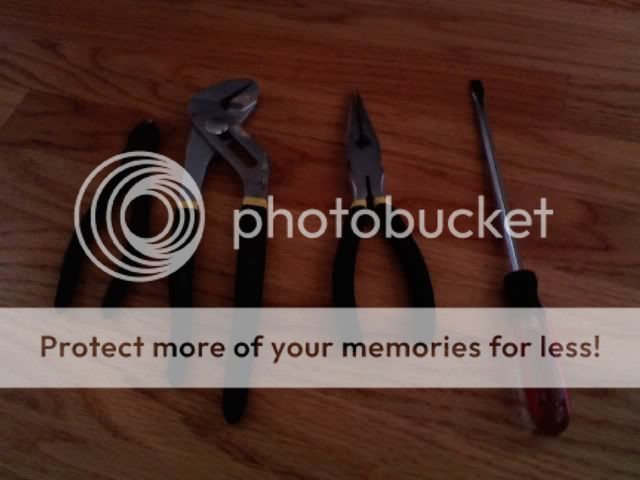
Here are the tools you will need in order from the picture: A wire cutter, big pliers, needle nose pliers, and a Flathead screwdriver.
![Image]()
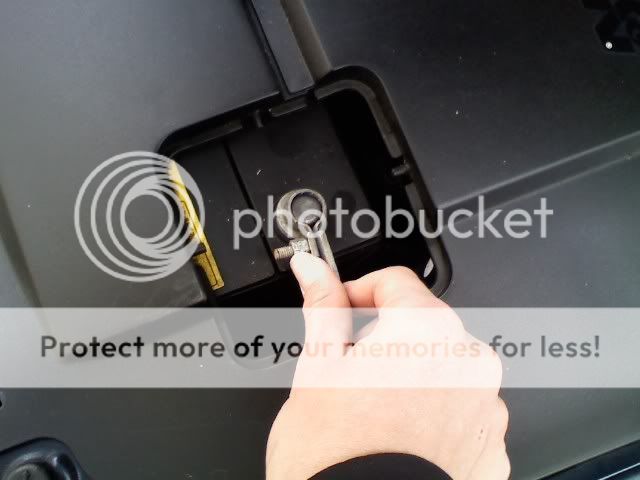
REMOVE THE BATTERY- for those of you who do not know how to remove the battery here you go. lift up the hood and unscrew the bolt holding on the battery ring thing with pliers or a wrench. you will not get electrocuted I promise (but don't sue me if you do)
![Image]()
pull off the ring thing and move it off to the side so that it is not touching the metal. you disconnect the battery so people don't get pissed hearing you car honk every few minutes from you hitting the horn while doing this.
OK, this DIY is pretty straight forward, but when I was about to do this, I wanted to see pics of people doing it just to make me feel better about doing it, but couldn't find em. So I did it anyway and took some pics for other people who feel the same way I do.
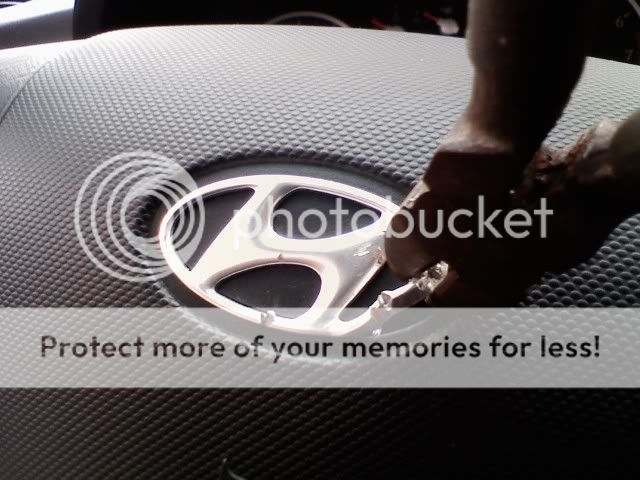
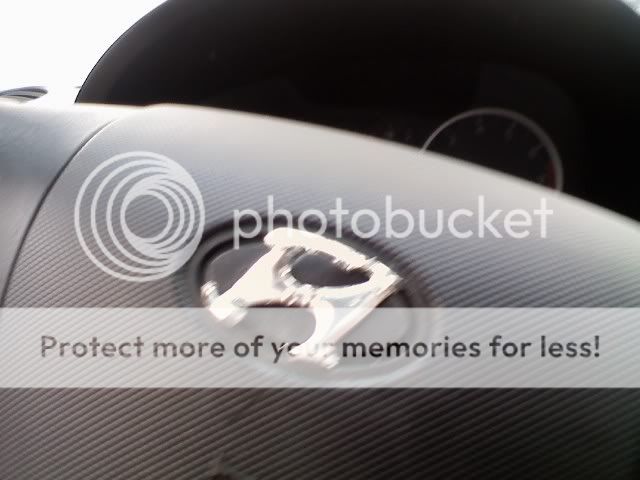
Start by pulling up one side of the H, left or right, it really doesn't matter. The wire cutters are your best friend because when you start to mangle the H with em, it gives a better surface for the needle nose pliers to hold on to...or just pull with the cutters like I did. start to pull the one side up as far as you can.
![Image]()
![Image]()
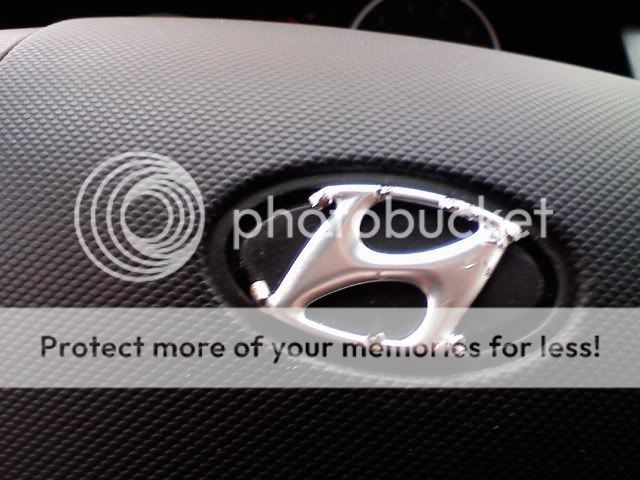
Cut that piece off but leave a little nub on the top on bottom part as little handles for the needle nose pliers to pull on later. You can either cut those now or wait till you pry up the other side. Pry up the other side the same way. You can use the flat head to get under and loosen stuff up, but be careful because it could slip and you could accidentally cut the material on the wheel. I got one cut, they are barely noticeable, but I recommend being careful with the flat head. here is the second side being pulled up. I did this one with the needle nose pliers.
![Image]()
now cut this side as well with little nubs left to pull on as seen in this pic.
![Image]()
now if you want, you can cut the top and bottom bridges. I cut them because I felt it would make things easier, but if you want to try to pull it off in one big piece, that's fine. Here I have cut the bottom one off. Use the wire cutter to cut each side, then it pops right off using the pliers. I didn't cut the top one off because it was already pulled up and I used it as a handle to grab on to.
![Image]()
Now to get the actual H off you have to Pull Pull Pull. Start with the right or left side because there are two metal pieces that are holding the H onto the steering wheel that you have to cut. I started with the left side and puled until that metal piece was visible, then put the wire cutters under and clipped the metal piece. Here you can see the piece you have to cut. it is the metal thing going into the steering wheel.
![Image]()
now you can cut away any excess that is in you way and start to pull on the right side until you can get to the metal piece holding that side in. Here is a pic of the peice on the right side.
![Image]()
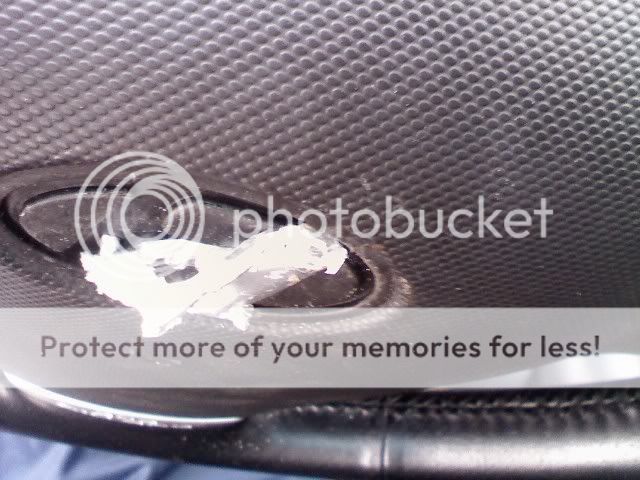
after cutting that the rest of the mangled H should just fall right off. Now you have a clean slate to work with. I personally got a midnight wolf stainless steel wheel emblem, but whatever suits your taste is fine. this was not difficult whatsoever and i recommend it over the sticker that goes over the H unless you want to keep the H.
Please feel free to make suggestions to add or subtract from this DIY, I can take constructive criticism. good rep is always appreciated if this helped you.
http://www.newtiburon.com/forums/showthread.php?t=19273
or by doing it this way. This way takes little mechanical know how and is for those people like me who have nightmares about taking stuff apart and attempting to put it back together again.
After doing this DIY you will NOT have the emblem anymore because it will be in pieces so if you want to keep the emblem so you can put it back on please use the other DIY.
Here are the tools you will need in order from the picture: A wire cutter, big pliers, needle nose pliers, and a Flathead screwdriver.
REMOVE THE BATTERY- for those of you who do not know how to remove the battery here you go. lift up the hood and unscrew the bolt holding on the battery ring thing with pliers or a wrench. you will not get electrocuted I promise (but don't sue me if you do)
pull off the ring thing and move it off to the side so that it is not touching the metal. you disconnect the battery so people don't get pissed hearing you car honk every few minutes from you hitting the horn while doing this.
OK, this DIY is pretty straight forward, but when I was about to do this, I wanted to see pics of people doing it just to make me feel better about doing it, but couldn't find em. So I did it anyway and took some pics for other people who feel the same way I do.
Start by pulling up one side of the H, left or right, it really doesn't matter. The wire cutters are your best friend because when you start to mangle the H with em, it gives a better surface for the needle nose pliers to hold on to...or just pull with the cutters like I did. start to pull the one side up as far as you can.

Cut that piece off but leave a little nub on the top on bottom part as little handles for the needle nose pliers to pull on later. You can either cut those now or wait till you pry up the other side. Pry up the other side the same way. You can use the flat head to get under and loosen stuff up, but be careful because it could slip and you could accidentally cut the material on the wheel. I got one cut, they are barely noticeable, but I recommend being careful with the flat head. here is the second side being pulled up. I did this one with the needle nose pliers.

now cut this side as well with little nubs left to pull on as seen in this pic.
now if you want, you can cut the top and bottom bridges. I cut them because I felt it would make things easier, but if you want to try to pull it off in one big piece, that's fine. Here I have cut the bottom one off. Use the wire cutter to cut each side, then it pops right off using the pliers. I didn't cut the top one off because it was already pulled up and I used it as a handle to grab on to.
Now to get the actual H off you have to Pull Pull Pull. Start with the right or left side because there are two metal pieces that are holding the H onto the steering wheel that you have to cut. I started with the left side and puled until that metal piece was visible, then put the wire cutters under and clipped the metal piece. Here you can see the piece you have to cut. it is the metal thing going into the steering wheel.
now you can cut away any excess that is in you way and start to pull on the right side until you can get to the metal piece holding that side in. Here is a pic of the peice on the right side.

after cutting that the rest of the mangled H should just fall right off. Now you have a clean slate to work with. I personally got a midnight wolf stainless steel wheel emblem, but whatever suits your taste is fine. this was not difficult whatsoever and i recommend it over the sticker that goes over the H unless you want to keep the H.
Please feel free to make suggestions to add or subtract from this DIY, I can take constructive criticism. good rep is always appreciated if this helped you.


