This is a exterior visual upgrade that will significantly improve the way your Tib looks and best of all...save you around $70 bucks. This DIY can also be used to remove/install a fuel door and trim...you pick. Takes around 20 minutes of actual work to do it, so what's stopping you?
Here we go fellas....
Remove The Fuel Door & Trim
Tools Needed: Metric Allen Wrenches (Forgot what size), Phillips Screwdriver
Step 1 -Open the fuel door and take out the four screws on the inside around the gas cap with your phillips screwdriver.
Step 2 -Use your allen wrench to remove the screws that are on your fuel door ring. Be careful on this step, I believe 3 or 4 of these screws have nuts on the back side, so pull up gently to lift up the rubber underside and pull the nuts through the rubber.
You have successfully removed the fuel door assembly. Pat yourself on the back.
Installation is the reverse of removal...for all you smarties out there.
Paint Your Fuel Door and Ring
Tools/Parts Needed: Silver Metallic Automotive Paint, Paint Basecoat or Promoter, Clear Coat, P400 Sandpaper, Superfine Sandpaper, Microfiber cloth (optional)
Note: Paint can be found at Wal-Mart, AutoZone, O'Reilly's...anywhere. Just grab the baby can of it and it'll be plenty. You don't have to use silver metallic. If you want a different look, try Gunmetal.
Step 1 -Take your P400 sandpaper and lightly sand the topcoat off the ring and door...preferrably, wet sand it. Smooth it out with your superfine grit sandpaper. Don't sand too much or you'll end up with a dip. You'll be able to see the basecoat...go no further.
Step 2 -Clean it up and get your painting setup ready...I used a bit of fishing line and a hook, hanging off a long nail in the wall as a setup...hangin the stuff up instead of painting off the floor/bench gives you a more even and accurate spray...just FYI.
Step 3 -Microfiber your part to remove dust and apply the promoter or primer. Use a light coat, wait around 10-15 minutes for the second coat...again for the third.
Step 4 -After it dries, apply your silver metallic paint using the same process.
Step 5 -After the paint dries, check your part for imperfections that may have arisen. This is your last chance to touch up if you need to. Feel free to lightly sand again to smooth out any grit then add another coat or two using the same process.
Step 6 -Seal it up with your clear coat. I used three coats, but two will do.
Step 7 -Give it overnight to completely dry and reinstall. That's it.
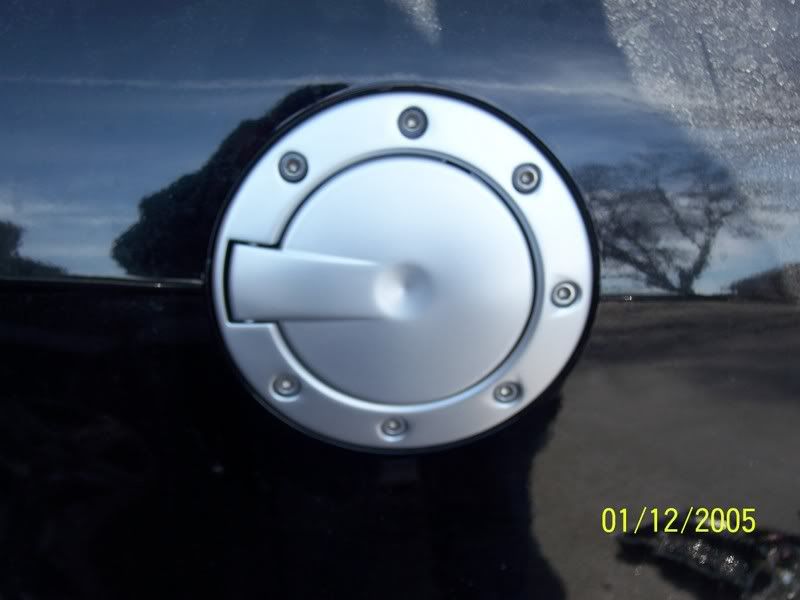
Pics up shortly....here they are...ignore the dates, they're way off.
![Image]()
![Image]()
Here we go fellas....
Remove The Fuel Door & Trim
Tools Needed: Metric Allen Wrenches (Forgot what size), Phillips Screwdriver
Step 1 -Open the fuel door and take out the four screws on the inside around the gas cap with your phillips screwdriver.
Step 2 -Use your allen wrench to remove the screws that are on your fuel door ring. Be careful on this step, I believe 3 or 4 of these screws have nuts on the back side, so pull up gently to lift up the rubber underside and pull the nuts through the rubber.
You have successfully removed the fuel door assembly. Pat yourself on the back.
Installation is the reverse of removal...for all you smarties out there.
Paint Your Fuel Door and Ring
Tools/Parts Needed: Silver Metallic Automotive Paint, Paint Basecoat or Promoter, Clear Coat, P400 Sandpaper, Superfine Sandpaper, Microfiber cloth (optional)
Note: Paint can be found at Wal-Mart, AutoZone, O'Reilly's...anywhere. Just grab the baby can of it and it'll be plenty. You don't have to use silver metallic. If you want a different look, try Gunmetal.
Step 1 -Take your P400 sandpaper and lightly sand the topcoat off the ring and door...preferrably, wet sand it. Smooth it out with your superfine grit sandpaper. Don't sand too much or you'll end up with a dip. You'll be able to see the basecoat...go no further.
Step 2 -Clean it up and get your painting setup ready...I used a bit of fishing line and a hook, hanging off a long nail in the wall as a setup...hangin the stuff up instead of painting off the floor/bench gives you a more even and accurate spray...just FYI.
Step 3 -Microfiber your part to remove dust and apply the promoter or primer. Use a light coat, wait around 10-15 minutes for the second coat...again for the third.
Step 4 -After it dries, apply your silver metallic paint using the same process.
Step 5 -After the paint dries, check your part for imperfections that may have arisen. This is your last chance to touch up if you need to. Feel free to lightly sand again to smooth out any grit then add another coat or two using the same process.
Step 6 -Seal it up with your clear coat. I used three coats, but two will do.
Step 7 -Give it overnight to completely dry and reinstall. That's it.
Pics up shortly....here they are...ignore the dates, they're way off.