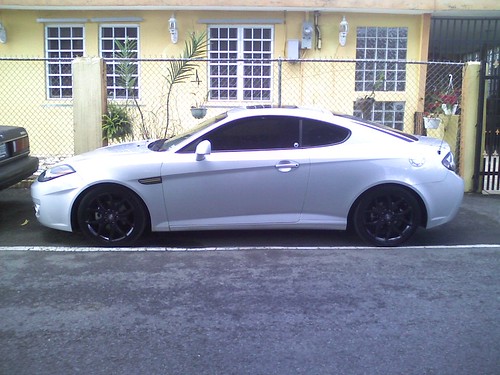
This is a do it yourself for painting your stock 17" rims. I did mine in gloss black and could not of been happier with the results. I used dupicolour paint primer and clearcoat.
PLEASE feel free to leave any comments or suggestions in this DIY, and if stuck or have any questions feel free to pm me and ask
Materials
600 and 1000 grit sandpaper
tape
razor
dupicolour scratch and fill primer
dupicolour gloss black paint
dupicolour wheel clearcoat
disposable table cloth
soap and water
Garage heater (if you live in canada) or anywhere cold
Just remember to take your time and to apply nice and even light coats of the paint and primer and clear. It will take time and you may get frusterated, but in the end it is well worth it. Just to see such a nice and clean finished product.
STEP 1
Remove your wheels from your car and clean the hell out of them, use soap and degreaser. Clean them as best as possible and once done, dry with a towel and let sit for a few hours for all remaining water to dry off aswell.
(for me im in canada and its winter so i had to turn on my garage heater and sit it out before i could begin them)
STEP 2
Now you can take your 600 grit sandpaper and begin to sand the surfaces of the rim in which you would like to paint the colour of your choice. Now i left my lip of the rim silver so i just sanded up to the edge of the rim leaving a little gap around. It does not have to be perfect sanding around the edge because later on you will clear coat over it again.
Once you have gone over the rims to remove all the clear coat or as much as possible
Once this is done you can do one of 2 steps.
1 - resand the wheels with 1000 grit sandpaper (WETSAND) to remove all the sand lines from the 600 grit. Same process of sanding.
2 - Just buy scratch and fill primer, which when you spray it it acts like a little bondo type material and fills in any scratches, it worked wonders for me.
STEP 3
Now clean them again with soap and let them dry completely, this should take some time.
STEP 4
Once the rims are dry take a roll of tape, painters tape works best and begin to mask around the outside lip if you are leaving the lip silver, if not just tape up the tire.
Once done it will look like this
![Image]()
STEP 5 (leaving the lip silver)
Take a small razor blade that you can find at any hardware store and using you thumb as a guide make a small cut along the tape. This cut will slide all the way along the rim and since your thumb will be between the razor and the lip it will make a perfect or dam near close circle.
It should look like this
![Image]()
THEN once you have gone all the way around you will be able to peel off the inside part revealing the circle
![Image]()
STEP 6
It is now time to cover the entire wheel to avoid paint spill during the painting process. I used a disposable type of tablecloth my father had lying around. Stretches and holds to tape really good. If you dont have this you can resort to newspaper or anything you can think of that will not let paint seep through.
![Image]()
This is how i did it, i layed the roll over the wheel
![Image]()
And using my razor i cut out around the circle of tape below it. It was see through so it made it much easier.
Remove it and you will have this
![Image]()
Now simply just tape the 2 circles together to get this
![Image]()
DO THE EXACT SAME FOR THE BACKSIDE
Then fold them in the middle along the centre of the tire and just tape around.
![Image]()
STEP 7
Once you have the wheel sanded and taped off you are ready to begin painting, this process before painting is very important, make sure that you take your time and sand properly and not to heavy in some spots, or too light in some spots. Now set up a table and cover it to avoid ruining your table and then grab your primer.
Begin by spraying a first light coat, Make sure you hold the can about 8" away and moving in a sweeping action turning the can on an angle with each pass to make sure all areas and creavases*** are covered. Its ok if not everything gets covered the first pass. You will be making more than one pass. Here are some pics. I DID A TOTAL OF 3 COATS FOR EACH PRIMER, COLOUR AND CLEAR, waiting about 10 minutes between each coat, and when i went to the colour from primer and clear from colour i let it sit for 30 minutes inbetween.
FIRST PASS REAR
![Image]()
FIRST PASS FRONT
![Image]()
FINAL PASS REAR
![Image]()
FINAL PASS FRONT
![Image]()
STEP 8
Once the wheel is primered let it sit for 30 minutes and begin to apply your colour of choice.
Same process as step 7 just with colour this time.
FIRST PASS FRONT
![Image]()
FINAL PASS FRONT
![Image]()
FIRST PASS REAR
![Image]()
FINAL PASS REAR
![Image]()
STEP 9
Now let the rims sit for 30 minutes after the colour has been applied. Usually it is 3 coats but you can do more if needed, remember just do very light coats to avoid drips in the paint.
Now begin the same process over again with the clear coat.
![Image]()
This is a comparison to show the difference between a finished wheel and a stock one
![Image]()
Once you have the 3 coats of clear coat applied your rims should look like this
![Image]()
STEP 10
Once the rims have been primered, coloured and then cleared let them sit for 24 HRS and then come back and remove the tape and all of the cloth covering the wheel and your product will look like this.
![Image]()
A little tip i was given was to just spray a light coat of clear coat over the edge where the black paint meets the silver lip to avoid any chipping on the outside of any fading. It adds a final layer of protection for your wheel. You will thank me in the end.
STEP 11
Once the wheels have dried for another 24 hrs, you can wetsand them with 2000 grit sandpaper, do a good job on this and your final product will have a nice gloss finish and the clearcoat will show it off well and hold up extremely well.
FINAL STEP
Install your wheels and enjoy saving alot of money.
PLEASE feel free to leave any comments or suggestions in this DIY, and if stuck or have any questions feel free to pm me and ask
Materials
600 and 1000 grit sandpaper
tape
razor
dupicolour scratch and fill primer
dupicolour gloss black paint
dupicolour wheel clearcoat
disposable table cloth
soap and water
Garage heater (if you live in canada) or anywhere cold
Just remember to take your time and to apply nice and even light coats of the paint and primer and clear. It will take time and you may get frusterated, but in the end it is well worth it. Just to see such a nice and clean finished product.
STEP 1
Remove your wheels from your car and clean the hell out of them, use soap and degreaser. Clean them as best as possible and once done, dry with a towel and let sit for a few hours for all remaining water to dry off aswell.
(for me im in canada and its winter so i had to turn on my garage heater and sit it out before i could begin them)
STEP 2
Now you can take your 600 grit sandpaper and begin to sand the surfaces of the rim in which you would like to paint the colour of your choice. Now i left my lip of the rim silver so i just sanded up to the edge of the rim leaving a little gap around. It does not have to be perfect sanding around the edge because later on you will clear coat over it again.
Once you have gone over the rims to remove all the clear coat or as much as possible
Once this is done you can do one of 2 steps.
1 - resand the wheels with 1000 grit sandpaper (WETSAND) to remove all the sand lines from the 600 grit. Same process of sanding.
2 - Just buy scratch and fill primer, which when you spray it it acts like a little bondo type material and fills in any scratches, it worked wonders for me.
STEP 3
Now clean them again with soap and let them dry completely, this should take some time.
STEP 4
Once the rims are dry take a roll of tape, painters tape works best and begin to mask around the outside lip if you are leaving the lip silver, if not just tape up the tire.
Once done it will look like this

STEP 5 (leaving the lip silver)
Take a small razor blade that you can find at any hardware store and using you thumb as a guide make a small cut along the tape. This cut will slide all the way along the rim and since your thumb will be between the razor and the lip it will make a perfect or dam near close circle.
It should look like this

THEN once you have gone all the way around you will be able to peel off the inside part revealing the circle

STEP 6
It is now time to cover the entire wheel to avoid paint spill during the painting process. I used a disposable type of tablecloth my father had lying around. Stretches and holds to tape really good. If you dont have this you can resort to newspaper or anything you can think of that will not let paint seep through.

This is how i did it, i layed the roll over the wheel

And using my razor i cut out around the circle of tape below it. It was see through so it made it much easier.
Remove it and you will have this

Now simply just tape the 2 circles together to get this

DO THE EXACT SAME FOR THE BACKSIDE
Then fold them in the middle along the centre of the tire and just tape around.

STEP 7
Once you have the wheel sanded and taped off you are ready to begin painting, this process before painting is very important, make sure that you take your time and sand properly and not to heavy in some spots, or too light in some spots. Now set up a table and cover it to avoid ruining your table and then grab your primer.
Begin by spraying a first light coat, Make sure you hold the can about 8" away and moving in a sweeping action turning the can on an angle with each pass to make sure all areas and creavases*** are covered. Its ok if not everything gets covered the first pass. You will be making more than one pass. Here are some pics. I DID A TOTAL OF 3 COATS FOR EACH PRIMER, COLOUR AND CLEAR, waiting about 10 minutes between each coat, and when i went to the colour from primer and clear from colour i let it sit for 30 minutes inbetween.
FIRST PASS REAR

FIRST PASS FRONT

FINAL PASS REAR

FINAL PASS FRONT

STEP 8
Once the wheel is primered let it sit for 30 minutes and begin to apply your colour of choice.
Same process as step 7 just with colour this time.
FIRST PASS FRONT

FINAL PASS FRONT

FIRST PASS REAR

FINAL PASS REAR

STEP 9
Now let the rims sit for 30 minutes after the colour has been applied. Usually it is 3 coats but you can do more if needed, remember just do very light coats to avoid drips in the paint.
Now begin the same process over again with the clear coat.

This is a comparison to show the difference between a finished wheel and a stock one

Once you have the 3 coats of clear coat applied your rims should look like this

STEP 10
Once the rims have been primered, coloured and then cleared let them sit for 24 HRS and then come back and remove the tape and all of the cloth covering the wheel and your product will look like this.

A little tip i was given was to just spray a light coat of clear coat over the edge where the black paint meets the silver lip to avoid any chipping on the outside of any fading. It adds a final layer of protection for your wheel. You will thank me in the end.
STEP 11
Once the wheels have dried for another 24 hrs, you can wetsand them with 2000 grit sandpaper, do a good job on this and your final product will have a nice gloss finish and the clearcoat will show it off well and hold up extremely well.
FINAL STEP
Install your wheels and enjoy saving alot of money.

")