Sense there are no actual guides for this on our site, here we go. First off, don't be too scared to do this one because it's really not that hard and should only take an hour at worst.
Tools you will need:
![Image]()
A few various length and sized philip's screw drivers
An L-shaped phillip's, don't have one? Well........... you will need it.
Straight screw driver
Start by removing the glove box, before you open it look at the bottom and you will see 3 phillips screws approximately 8-10 inches apart, take them out. Open the glove box and look at the top, 3 more screws, take them out. Now, make sure you've un-hooked the light at the top of the golve box, use a straight screw driver, pop it out and unplug the wires. Now pull the glove box down, there are 2 clips holding it in place, a quick snap down and they should let go and the box is in your hands.
All done the easy stuff................
Now lay your head in next to the fire wall and look up, you should see this:
![Image]()
(I apologize for the numbers being hard to read, #1 is the back screw and #2 holds it to the air vent) Start here by removing these 2 screws, screw #2 is where the L-shaped screw drive comes in. There's less then 3 inches to work with here.
![Image]()
Now remove #3. Yes that is the air bag right beside it and no I did not disconnect the battery.
Ok at this point its been all fun and games, now on to the hard ones.
![Image]()
Screw #4 isn't bad, you can get this from the floor where you took the first three screws out. I passed a 6 inch driver through from the outside and in, from there just held with my right and at the butt and left to twist.
#5 is the hard one, you can drill a hole, use some sort of fancy 100 knuckled tool or you can use a screw driver that is smaller then the screw head. As in if you tried to use it straight on it would barely grab the screw. Get on the outside and untangle your self for a minute. In the first picture with the tools you can see the screw driver I used (furthest right), slightly too small but a longer reach. If you work the screw driver in just right and use a little leverage with the screw driver you can bend the dash get just enough of a bite on the screw to get out. This way when your done there's no hole and it's up to you if you want to put the screw back in. I did manage to get all 5 back in because I'm picky, although #5 was a pain it is possible to get it back in without drilling a hole.
![Image]()
Now that all the screws are out, take a breath. The only part of the removal left are these two tabs, if you wiggle the box around and push it will let go.
![Image]()
Now this is what your left with, lovely isn't it?
Take your new cup holder and put it up in place. Take a minute to take a look around it and make sure nothing is going to interfere with it and look at the alignment.
Now the install...... and you thought you were getting away without and scratches hahaha
![Image]()
Some people have mentioned this bracket needed to be bent a little. Mine didn't need anything done, the module fit in fine and there's a 2-3mm's of room around it.
Now, I personally put the screws back in numerical order, #1-2-3-4-5. When putting #1 back in be careful, I sat on the door edge and looked in while I gently pushed the screw back in, this way you can see where it's going and adjust it as necessary. Meanwhile screw #5, I frigged around for 5 or so minutes, gently working (and cursing) and finally managed to get it in the hole and make a turn or two on it by finger tip. Then got the longer screw driver again and finished it up.
Drum roll please..............
![Image]()
Pat your self on the back and enjoy your handy work.
Couple of notes:
- Socket wrench wasn't actually used (was in the pile from another project).
- I never really did find the stubby useful, there was enough room to use a 6-8" screw driver.
- If you have a dash trim kit like mine (aluminum and 3M tape) you will probably need to trim it around the opening for the cup holder. I just used a razor knife to trim around the edges.
- The bracket attached to the back box, I didn't bother removing the screws because the one at the very back (screw #1) was the only one holding the box on to the car.
- All and all, this is an easy install. My total time was roughly 45 minutes but if I had a write up like this one earlier today I would've been done in 30 minutes. Just make sure you have the right tools, if you don't have the L-screw driver go buy a $5 kit from your local surplus store.
- If I had to do this again I would like to say I'd just drill the hole in the dash to remove #5, really its up to the you to decide. I don't personally like drilling holes if I don't need to, it's a worst case scenario for me personally.
- Oh and don't forget the peroxide for those cuts lol. I got off easy with only 2 small ones.
If there's anything I forgot to cover that you can think of or you still have questions, don't hesitate to PM me.
Tools you will need:

A few various length and sized philip's screw drivers
An L-shaped phillip's, don't have one? Well........... you will need it.
Straight screw driver
Start by removing the glove box, before you open it look at the bottom and you will see 3 phillips screws approximately 8-10 inches apart, take them out. Open the glove box and look at the top, 3 more screws, take them out. Now, make sure you've un-hooked the light at the top of the golve box, use a straight screw driver, pop it out and unplug the wires. Now pull the glove box down, there are 2 clips holding it in place, a quick snap down and they should let go and the box is in your hands.
All done the easy stuff................
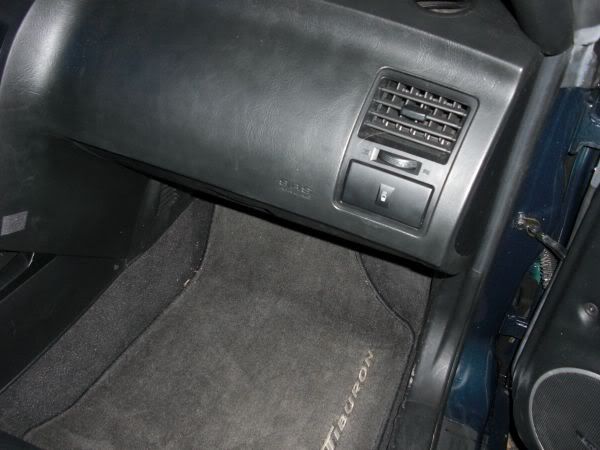
Now lay your head in next to the fire wall and look up, you should see this:

(I apologize for the numbers being hard to read, #1 is the back screw and #2 holds it to the air vent) Start here by removing these 2 screws, screw #2 is where the L-shaped screw drive comes in. There's less then 3 inches to work with here.

Now remove #3. Yes that is the air bag right beside it and no I did not disconnect the battery.
Ok at this point its been all fun and games, now on to the hard ones.

Screw #4 isn't bad, you can get this from the floor where you took the first three screws out. I passed a 6 inch driver through from the outside and in, from there just held with my right and at the butt and left to twist.
#5 is the hard one, you can drill a hole, use some sort of fancy 100 knuckled tool or you can use a screw driver that is smaller then the screw head. As in if you tried to use it straight on it would barely grab the screw. Get on the outside and untangle your self for a minute. In the first picture with the tools you can see the screw driver I used (furthest right), slightly too small but a longer reach. If you work the screw driver in just right and use a little leverage with the screw driver you can bend the dash get just enough of a bite on the screw to get out. This way when your done there's no hole and it's up to you if you want to put the screw back in. I did manage to get all 5 back in because I'm picky, although #5 was a pain it is possible to get it back in without drilling a hole.

Now that all the screws are out, take a breath. The only part of the removal left are these two tabs, if you wiggle the box around and push it will let go.

Now this is what your left with, lovely isn't it?
Take your new cup holder and put it up in place. Take a minute to take a look around it and make sure nothing is going to interfere with it and look at the alignment.
Now the install...... and you thought you were getting away without and scratches hahaha

Some people have mentioned this bracket needed to be bent a little. Mine didn't need anything done, the module fit in fine and there's a 2-3mm's of room around it.
Now, I personally put the screws back in numerical order, #1-2-3-4-5. When putting #1 back in be careful, I sat on the door edge and looked in while I gently pushed the screw back in, this way you can see where it's going and adjust it as necessary. Meanwhile screw #5, I frigged around for 5 or so minutes, gently working (and cursing) and finally managed to get it in the hole and make a turn or two on it by finger tip. Then got the longer screw driver again and finished it up.
Drum roll please..............

Pat your self on the back and enjoy your handy work.
Couple of notes:
- Socket wrench wasn't actually used (was in the pile from another project).
- I never really did find the stubby useful, there was enough room to use a 6-8" screw driver.
- If you have a dash trim kit like mine (aluminum and 3M tape) you will probably need to trim it around the opening for the cup holder. I just used a razor knife to trim around the edges.
- The bracket attached to the back box, I didn't bother removing the screws because the one at the very back (screw #1) was the only one holding the box on to the car.
- All and all, this is an easy install. My total time was roughly 45 minutes but if I had a write up like this one earlier today I would've been done in 30 minutes. Just make sure you have the right tools, if you don't have the L-screw driver go buy a $5 kit from your local surplus store.
- If I had to do this again I would like to say I'd just drill the hole in the dash to remove #5, really its up to the you to decide. I don't personally like drilling holes if I don't need to, it's a worst case scenario for me personally.
- Oh and don't forget the peroxide for those cuts lol. I got off easy with only 2 small ones.
If there's anything I forgot to cover that you can think of or you still have questions, don't hesitate to PM me.